


简介
针对github release、archive以及项目文件的加速项目,支持clone,有Cloudflare Workers无服务器版本以及Python版本
演示
GitHub地址
https://github.com/hunshcn/gh-proxy
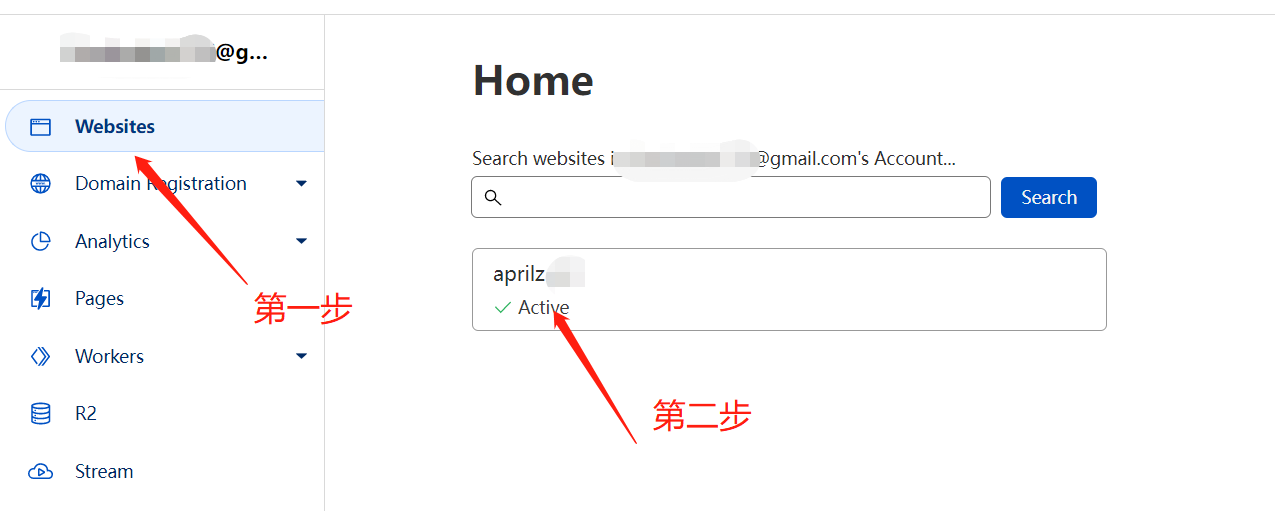
## 1 注册登录 cloudflare
注册地址: https://dash.cloudflare.com/login
登陆你的cloudflare账号,左侧websites添加DNS解析你的站点到clouflare,按步骤操作
2 workers创建服务
点击左边侧栏的Workers,然后点击创建服务
服务名称填上你的,随便起,链接上会体现的,其他的默认不动,填完点击创建服务Create a Service

点击 快速编辑,把下面的代码粘贴上,然后点击保存部署,然后发送测试,200则代表成功!!!
'use strict'

/**
 * static files (404.html, sw.js, conf.js)
 */
const ASSET_URL = 'https://hunshcn.github.io/gh-proxy/'
// 前缀,如果自定义路由为example.com/gh/*,将PREFIX改为 '/gh/',注意,少一个杠都会错!
const PREFIX = '/'
// 分支文件使用jsDelivr镜像的开关,0为关闭,默认关闭
const Config = {
    jsdelivr: 0
}

const whiteList = [] // 白名单,路径里面有包含字符的才会通过,e.g. ['/username/']

/** @type {RequestInit} */
const PREFLIGHT_INIT = {
    status: 204,
    headers: new Headers({
        'access-control-allow-origin': '*',
        'access-control-allow-methods': 'GET,POST,PUT,PATCH,TRACE,DELETE,HEAD,OPTIONS',
        'access-control-max-age': '1728000',
    }),
}


const exp1 = /^(?:https?:\/\/)?github\.com\/.+?\/.+?\/(?:releases|archive)\/.*$/i
const exp2 = /^(?:https?:\/\/)?github\.com\/.+?\/.+?\/(?:blob|raw)\/.*$/i
const exp3 = /^(?:https?:\/\/)?github\.com\/.+?\/.+?\/(?:info|git-).*$/i
const exp4 = /^(?:https?:\/\/)?raw\.(?:githubusercontent|github)\.com\/.+?\/.+?\/.+?\/.+$/i
const exp5 = /^(?:https?:\/\/)?gist\.(?:githubusercontent|github)\.com\/.+?\/.+?\/.+$/i
const exp6 = /^(?:https?:\/\/)?github\.com\/.+?\/.+?\/tags.*$/i

/**
 * @param {any} body
 * @param {number} status
 * @param {Object<string, string>} headers
 */
function makeRes(body, status = 200, headers = {}) {
    headers['access-control-allow-origin'] = '*'
    return new Response(body, {status, headers})
}


/**
 * @param {string} urlStr
 */
function newUrl(urlStr) {
    try {
        return new URL(urlStr)
    } catch (err) {
        return null
    }
}


addEventListener('fetch', e => {
    const ret = fetchHandler(e)
        .catch(err => makeRes('cfworker error:\n' + err.stack, 502))
    e.respondWith(ret)
})


function checkUrl(u) {
    for (let i of [exp1, exp2, exp3, exp4, exp5, exp6]) {
        if (u.search(i) === 0) {
            return true
        }
    }
    return false
}

/**
 * @param {FetchEvent} e
 */
async function fetchHandler(e) {
    const req = e.request
    const urlStr = req.url
    const urlObj = new URL(urlStr)
    let path = urlObj.searchParams.get('q')
    if (path) {
        return Response.redirect('https://' + urlObj.host + PREFIX + path, 301)
    }
    // cfworker 会把路径中的 `//` 合并成 `/`
    path = urlObj.href.substr(urlObj.origin.length + PREFIX.length).replace(/^https?:\/+/, 'https://')
    if (path.search(exp1) === 0 || path.search(exp5) === 0 || path.search(exp6) === 0 || path.search(exp3) === 0 || path.search(exp4) === 0) {
        return httpHandler(req, path)
    } else if (path.search(exp2) === 0) {
        if (Config.jsdelivr) {
            const newUrl = path.replace('/blob/', '@').replace(/^(?:https?:\/\/)?github\.com/, 'https://cdn.jsdelivr.net/gh')
            return Response.redirect(newUrl, 302)
        } else {
            path = path.replace('/blob/', '/raw/')
            return httpHandler(req, path)
        }
    } else if (path.search(exp4) === 0) {
        const newUrl = path.replace(/(?<=com\/.+?\/.+?)\/(.+?\/)/, '@$1').replace(/^(?:https?:\/\/)?raw\.(?:githubusercontent|github)\.com/, 'https://cdn.jsdelivr.net/gh')
        return Response.redirect(newUrl, 302)
    } else {
        return fetch(ASSET_URL + path)
    }
}


/**
 * @param {Request} req
 * @param {string} pathname
 */
function httpHandler(req, pathname) {
    const reqHdrRaw = req.headers

    // preflight
    if (req.method === 'OPTIONS' &&
        reqHdrRaw.has('access-control-request-headers')
    ) {
        return new Response(null, PREFLIGHT_INIT)
    }

    const reqHdrNew = new Headers(reqHdrRaw)

    let urlStr = pathname
    let flag = !Boolean(whiteList.length)
    for (let i of whiteList) {
        if (urlStr.includes(i)) {
            flag = true
            break
        }
    }
    if (!flag) {
        return new Response("blocked", {status: 403})
    }
    if (urlStr.startsWith('github')) {
        urlStr = 'https://' + urlStr
    }
    const urlObj = newUrl(urlStr)

    /** @type {RequestInit} */
    const reqInit = {
        method: req.method,
        headers: reqHdrNew,
        redirect: 'manual',
        body: req.body
    }
    return proxy(urlObj, reqInit)
}


/**
 *
 * @param {URL} urlObj
 * @param {RequestInit} reqInit
 */
async function proxy(urlObj, reqInit) {
    const res = await fetch(urlObj.href, reqInit)
    const resHdrOld = res.headers
    const resHdrNew = new Headers(resHdrOld)

    const status = res.status

    if (resHdrNew.has('location')) {
        let _location = resHdrNew.get('location')
        if (checkUrl(_location))
            resHdrNew.set('location', PREFIX + _location)
        else {
            reqInit.redirect = 'follow'
            return proxy(newUrl(_location), reqInit)
        }
    }
    resHdrNew.set('access-control-expose-headers', '*')
    resHdrNew.set('access-control-allow-origin', '*')

    resHdrNew.delete('content-security-policy')
    resHdrNew.delete('content-security-policy-report-only')
    resHdrNew.delete('clear-site-data')

    return new Response(res.body, {
        status,
        headers: resHdrNew,
    })
}
3添加自定义域名
** 注意: 使用cloudflare自己提供的域名 https://xx.workers.dev,有被墙风险,有时候会访问404,建议和我一样上freenom注册一个免费域名,这种比较稳定**
点击websites,把自定义域名的DNS解析到cloudflare,如果是cloudflare买的域名则可省略这一步,然后点击右上角websites
配置域名解析

配置workers routes 映射到之前配置的Service

访问自定义域名,测试是否可以使用即可!!!
参考以下:


评论区